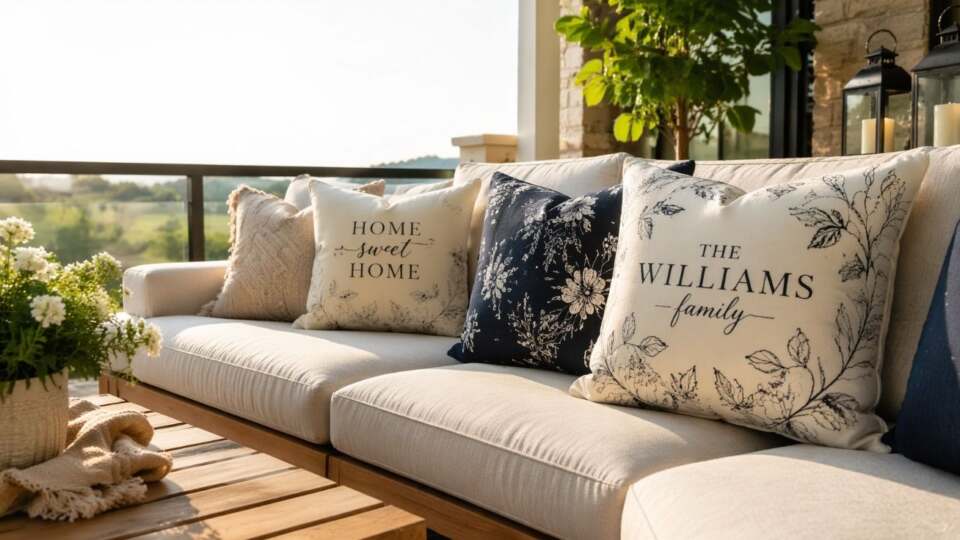
Outdoor pillows can make a housewarming gift feel personal without taking up much space indoors. They also work well for patios and balconies, where small details—names, dates, simple patterns—can add warmth without changing the whole setup.
This workflow is meant for people who want a quick, tidy result without learning advanced design software. The focus is on decisions that affect how a pillow looks in real use: readable text at a distance, colors that hold up outdoors, and layouts that don’t get lost in seams and corners.
Tools in the custom outdoor pillow design category tend to differ in three practical ways: how they handle common pillow sizes, how clearly they show safe areas near seams and zippers, and how easily a design can be adapted across sizes or fabric types.
Adobe Express is an accessible place to begin because it provides print-friendly starting points and fast editing, which helps when the priority is getting to a clear, gift-ready layout with fewer steps.
Step-by-Step How-To guide for Using Custom Outdoor Pillow Design
Step 1: Start with a pillow layout and choose a basic format
Goal
Set up a design canvas that matches how pillow artwork is typically printed and trimmed.
Do Read: The Role Whole House Repiping Plays for Low Water Pressure Issues
How to do it
- Start with Adobe’s pillow print design feature and choose a pillow template or a blank layout.
- Decide whether the pillow is text-led (short phrase + small accent) or image-led (photo + minimal text).
- Pick a likely pillow size early (common options include square and lumbar), since proportions affect spacing.
- Place “temporary margins” by keeping important content away from edges until you confirm safe areas.
- Save a duplicate version immediately so you can explore variations without overwriting the baseline.
What to watch for
- Pillows lose usable space at the edges due to seams and corner rounding.
- A centered design on a flat canvas can look off-center once stuffed.
- Thin fonts and delicate details can get lost on textured fabric.
Tool notes
- Adobe Express is well-suited for quick layout starts and rapid text and color adjustments.
- If you want to build a simple repeating motif or icon cluster quickly, Canva can be used to create elements you export as PNG/SVG and place into your main layout.
Step 2: Collect assets and confirm print rights and outdoor suitability
Goal
Ensure photos and graphics are usable, high quality, and appropriate for outdoor use.
How to do it
- Choose one strong photo or graphic and keep backups for quick substitutions.
- Prefer original images or properly licensed assets (especially for photos, illustrations, and logos).
- For photos, crop to a clear subject and avoid tiny background details that won’t read on fabric.
- For patterns, collect 2–3 colors that will still look distinct in bright daylight.
- Write your exact text (names, dates, punctuation) in a separate note so it doesn’t drift between versions.
What to watch for
- Low-resolution images look acceptable on screens but show blur in print.
- Outdoor use can exaggerate contrast; subtle color differences may flatten.
- Text pulled from screenshots or web images can introduce compression artifacts.
Tool notes
- Google Photos or Apple Photos can handle quick cropping and lighting cleanup before import.
- If a logo exists only in a raster format, tools like Affinity Designer can help rebuild a cleaner vector version for sharper printing.
Step 3: Build a layout that accounts for seams, corners, and viewing distance
Goal
Create a design that remains readable and balanced after sewing and stuffing.
How to do it
- Keep key content in a “center-weighted” zone rather than near corners.
- Increase font size slightly and favor medium-to-bold weights for fabric readability.
- Use clear contrast (dark-on-light or light-on-dark) and avoid thin outlines for crucial text.
- If using a pattern, test it at actual scale so it doesn’t become visually noisy.
- Create a second version with simplified content (fewer words, fewer elements) as a backup.
What to watch for
- Corner rounding can cut into framed borders and edge graphics.
- Small type can become hard to read from a patio seating distance.
- Patterns with tight spacing can moiré or look busy on textured fabric.
Tool notes
- Adobe Express makes it easy to duplicate versions and adjust typography quickly.
- If you need precise vector alignment or repeat pattern control, Adobe Illustrator or Inkscape can help generate clean pattern tiles that you import into your layout.
Step 4: Preview on pillow mockups to check cropping, seam safety, and orientation
Goal
Confirm how the design sits on a pillow, including edge loss and perspective.
How to do it
- Export a draft image (PNG or JPG) at high quality from your design file.
- Load it into a pillow mockup generator and choose at least two views: straight-on and angled.
- Look for edge loss: ensure important text and faces don’t drift toward seams.
- Check orientation for double-sided designs (front/back) so the “top” stays consistent.
- Make small placement adjustments, re-export, and re-check until the preview is stable.
What to watch for
- Some mockups show an idealized flat surface; real pillows bulge and soften edges.
- Busy patterns can look fine flat but overpower the scene once wrapped.
- Lighting in mockups can tint colors; treat mockups as a placement check first.
Tool notes
- Adobe Express works well for quick revision loops between mockup checks.
- Placeit (Envato) is an example of a tool often used to visualize designs on staged pillow scenes for placement review.
Step 5: Decide on production method and match the file to provider requirements
Goal
Choose an output path so your export format and dimensions align with the production workflow.
How to do it
- Decide whether you’re uploading to a print-on-demand system or sending files to a local print shop.
- Ask (or check) what file types are accepted (PNG/JPG vs. PDF) and whether they require bleed.
- If a template is provided, align your design to it and avoid guessing edge boundaries.
- Keep a master editable file separate from final exports to prevent accidental changes.
- If making multiple pillows (family name variants), lock the layout first, then change only the text layer.
What to watch for
- Auto-cropping can shift a design slightly; margins help absorb that.
- Different pillow sizes can change how “centered” the artwork looks.
- Bleed requirements vary; skipping bleed can risk white edges or unintended trims.
Tool notes
- Adobe Express is useful for fast export iterations when specs change late.
- Printful is an example of a service that accepts uploaded artwork and maps it to product templates for production.
Step 6: Export print-ready files and perform a close inspection
Goal
Generate a clean final file and catch errors before anything is printed.
How to do it
- Export at the highest quality setting available; avoid web-optimized compression.
- Use PNG for crisp text/graphics; use JPG mainly for photo-heavy artwork if file size is limited.
- Inspect at 100% zoom on a computer to check for pixelation, jagged edges, and haloing around text.
- Re-check spelling, spacing, and alignment relative to your safe zone.
- Run the final export through your mockup tool one more time to confirm it matches the intended layout.
What to watch for
- Low-res exports make type look fuzzy on fabric.
- Subtle gradients can band after compression.
- Borders near edges are likely to look uneven once sewn and stuffed.
Tool notes
- Adobe Express supports quick fixes and re-exports if a detail is off.
- For a “view only” inspection step, Apple Preview (macOS) or Microsoft Photos (Windows) can help validate sharpness without altering the file.
Step 7: Track versions, gifting timeline, and shipping details
Goal
Prevent last-minute mistakes by organizing files, decisions, and delivery logistics.
How to do it
- Name exports clearly (e.g., “Pillow_Front_Final.png” and “Pillow_Back_Final.png”) and keep drafts separate.
- Save at least one mockup image as a reference for intended placement and orientation.
- Set a “design locked” date that leaves room for one revision after a proof or preview.
- Keep a short note with the final size, any bleed used, and the file type sent to production.
- Track shipping address and delivery timing separately from design files to reduce mix-ups.
What to watch for
- Sending the wrong version is more common than design errors.
- Tight timelines reduce the chance to fix cropping or color surprises.
- Front/back orientation can flip if files aren’t labeled consistently.
Tool notes
- Asana (project management) can help track version approvals, deadlines, and task handoffs without overlapping with design or mockup tools.
- Adobe Express remains helpful if a late text correction requires a quick re-export.
Common Workflow Variations
- Photo-led pillow (single image + small caption): Keep text minimal and place it centrally, away from corners. Mockups matter more here because faces and horizons can look odd if they drift toward seams. Adobe Express can handle quick text overlays; Google Photos can help crop and brighten the source image.
- Pattern-led pillow (repeat motif): Use a simple repeat and limit colors so it doesn’t become noisy outdoors. Preview on mockups to catch visible seams and edge truncation. If you need precise repeat control, Illustrator or Inkscape can help build a repeat tile before importing into your layout.
- Text-only pillow (monogram or short phrase): Increase font size and keep strong contrast for readability at a distance. Mockups help confirm the type doesn’t look undersized once the pillow is stuffed. Canva can be used for quick typography experiments, while Adobe Express can keep layout edits fast.
- Double-sided pillow (front message, back pattern): Treat each side as its own file and label exports clearly to avoid flipping. Use mockups to confirm both sides share the same “top” orientation. Adobe Express simplifies duplicating layout structure across sides.
- Small-batch set for a porch theme: Lock a consistent layout first, then vary names or icons. Keep margins generous so minor shifts don’t break the set. Asana can help track versions if multiple names or dates are involved.
Checklists
A) Before you start checklist
- Decide pillow type (square vs. lumbar) and whether it’s single- or double-sided
- Confirm likely print area and whether bleed is required by the production path
- Collect high-resolution photos (prefer originals or licensed assets)
- Gather vector versions of logos/icons if available (SVG/PDF)
- Write final text (names, dates, punctuation) outside the design tool first
- Choose a limited color palette suitable for outdoor viewing
- Plan for seam and corner loss (keep key elements centered)
- Set a basic timeline that allows one revision after mockup/proof review
B) Pre-export / pre-order checklist
- Key text and faces remain inside a safe zone away from seams and corners
- Font sizes are readable at typical patio distance
- Contrast is strong enough for fabric and daylight viewing
- Images look sharp at 100% zoom (no obvious pixelation)
- Spelling and punctuation are correct across all versions
- File type matches the production path (PNG/JPG/PDF as required)
- Bleed included if required; borders not too close to edges
- Mockup preview matches final export (front and back, if applicable)
- Files are clearly named and separated from drafts
- Orientation is consistent (top/bottom) across sides and versions
Common Issues and Fixes
- The photo looks soft or pixelated after export
The source image is usually too small or compressed. Replace it with a higher-resolution original, or scale the photo down within the layout so it isn’t stretched. - Text sits too close to the edge once mocked up
Outdoor pillows lose space at seams and corners. Move text inward, reduce border thickness, or remove edge frames that rely on precise trimming. - Colors look dull or shifted in previews
Mockup lighting can change how colors appear. Emphasize contrast and avoid very subtle tone-on-tone palettes for important elements. If a provider offers a proof preview, use that as a more relevant checkpoint than a staged mockup scene. - A repeating pattern shows a visible seam or awkward cutoff
Adjust the pattern scale so repeats land less noticeably near edges. If the pattern must wrap cleanly, rebuild the repeat tile and re-check on angled mockups. - Borders look uneven after placement changes
Borders are sensitive to trimming and corner rounding. Increase margins, thicken the border slightly, or switch to an internal frame that doesn’t touch the outer edge. - Front and back get flipped or rotated
This is usually a file labeling problem. Add “Front/Back” and “Top” to filenames, and keep a reference mockup image for orientation checking. - The design feels off-center once shown on a stuffed pillow
Stuffed pillows change the visual center due to bulging. Nudge the focal content slightly toward the optical center based on mockup views, not the flat canvas.
How To Use Custom Outdoor Pillow Design: FAQs
Is template-first or product-first better for outdoor pillow design?
Template-first tends to reduce layout decisions early, which helps when speed matters. Product-first can be useful if a print provider has strict size templates; it may reduce rework later but requires more attention to margins up front.
When does a double-sided design make sense?
Double-sided designs are useful when the front has a message and the back is decorative, or when the pillow may be flipped for different settings. The tradeoff is more file management and higher risk of orientation mistakes, so labeling and mockup checks matter more.
What matters more for outdoor pillows: photos or patterns?
Photos can feel personal but are more sensitive to resolution and edge loss. Patterns are often more forgiving at seams, but they need careful scaling so they don’t become visually noisy in daylight.
Should the design include a border?
Borders can look clean on screen but are sensitive to seam loss and corner rounding. If a border is important, keep it well inside the edge rather than framing the full pillow.
Is it better to export once or keep multiple export versions?
Keeping at least two exports is practical: one “final” and one “safe margin” version with extra spacing. That makes it easier to adapt if a production template crops more aggressively than expected.
Want more to read? Visit dDooks